when I remote log into a machine of a clusters via a domain record for example ssh.xyz.edu, it is not the machine that I want my apps to execute upon on, I wish to connect to the more powerful machine that cannot be reached from outside the campus, one way to do so is to connect from machine that I’m on and then log in again to that other machine in order to invoke the heavy lifting commands. However, it would not work if I want to run X Window apps on that powerful machine and wish the windows to be shown on my local computer, it is straightforward that the app’s windows should be shown in the machine that I logged into initially, so how can I be able to solve the problem? There are actually 2 questions, first find the powerful machine that doesn’t have a lot of loads. Second, how to allow the app’s windows running on the powerful machine shown in my local computer.
Checking machine hardware info
It is fairly easy to check the hardware info by running cat /proc/xxx where xxx could be related to cpu or memory info, suppose we want to check the cpu info.
cat /proc/cpuinfoWe could get the following results:
[user@ssh ~]$ cat /proc/cpuinfo
processor	: 0
vendor_id	: GenuineIntel
cpu family	: 15
model		: 4
model name	: Intel(R) Pentium(R) D CPU 3.00GHz
stepping	: 7
microcode	: 0x3
cpu MHz		: 3000.288
cache size	: 1024 KB
physical id	: 0
siblings	: 2
core id		: 0
cpu cores	: 2
apicid		: 0
initial apicid	: 0
fpu		: yes
fpu_exception	: yes
cpuid level	: 5
wp		: yes
flags		: fpu vme de pse tsc msr pae mce cx8 apic sep mtrr pge mca cmov pat pse36 clflush dts acpi mmx fxsr sse sse2 ss ht tm pbe syscall nx lm constant_tsc pebs bts nopl eagerfpu pni dtes64 monitor ds_cpl est cid cx16 xtpr lahf_lm
bogomips	: 6000.57
clflush size	: 64
cache_alignment	: 128
address sizes	: 36 bits physical, 48 bits virtual
power management:

processor	: 1
vendor_id	: GenuineIntel
cpu family	: 15
model		: 4
model name	: Intel(R) Pentium(R) D CPU 3.00GHz
stepping	: 7
microcode	: 0x3
cpu MHz		: 3000.288
cache size	: 1024 KB
physical id	: 0
siblings	: 2
core id		: 1
cpu cores	: 2
apicid		: 1
initial apicid	: 1
fpu		: yes
fpu_exception	: yes
cpuid level	: 5
wp		: yes
flags		: fpu vme de pse tsc msr pae mce cx8 apic sep mtrr pge mca cmov pat pse36 clflush dts acpi mmx fxsr sse sse2 ss ht tm pbe syscall nx lm constant_tsc pebs bts nopl eagerfpu pni dtes64 monitor ds_cpl est cid cx16 xtpr lahf_lm
bogomips	: 6000.57
clflush size	: 64
cache_alignment	: 128
address sizes	: 36 bits physical, 48 bits virtual
power management:
As you can see, there are only 2 cores for the cpu which is not ideal to run computational intensive tasks, but it is just used for people to access on the cluster using ssh command. There are lots of details given regarding the specs, I’m not going to dig into every detail of the output.
It could be easier to check the numbers of cores for the machine using the following command since the output shown above could be too tedious.
cat /proc/cpuinfo | grep '^processor' | wcYou could also check the memory info using the following command:
cat /proc/meminfoThe output would be shown as follows:
[user@ssh ~]$ cat /proc/meminfo
MemTotal:        8009104 kB
MemFree:          479372 kB
MemAvailable:    2884656 kB
Buffers:               0 kB
Cached:          2327424 kB
SwapCached:        47540 kB
Active:          3886344 kB
Inactive:        2048772 kB
Active(anon):    2894452 kB
Inactive(anon):  1079848 kB
Active(file):     991892 kB
Inactive(file):   968924 kB
Unevictable:          80 kB
Mlocked:              80 kB
SwapTotal:       8258556 kB
SwapFree:        2699300 kB
Dirty:                88 kB
Writeback:             0 kB
AnonPages:       3561880 kB
Mapped:           354748 kB
Shmem:            366608 kB
Slab:            1170148 kB
SReclaimable:    1017512 kB
SUnreclaim:       152636 kB
KernelStack:       28160 kB
PageTables:       148924 kB
NFS_Unstable:         40 kB
Bounce:                0 kB
WritebackTmp:          0 kB
CommitLimit:    12263108 kB
Committed_AS:   19508444 kB
VmallocTotal:   34359738367 kB
VmallocUsed:       87260 kB
VmallocChunk:   34359537660 kB
Percpu:             1072 kB
HardwareCorrupted:     0 kB
AnonHugePages:     24576 kB
CmaTotal:              0 kB
CmaFree:               0 kB
HugePages_Total:       0
HugePages_Free:        0
HugePages_Rsvd:        0
HugePages_Surp:        0
Hugepagesize:       2048 kB
DirectMap4k:      110328 kB
DirectMap2M:     8278016 kB
Find the least utilized machine in the cluster
If I want to run the command I first need to find out the least utilized machine in the cluster, I can use the command uptime to do so.
[user@cluster ~]$ uptime
 19:39:37 up 51 days, 20:58, 16 users,  load average: 1.32, 1.51, 1.37
As you can see from the output, one can focus on the load average with 3 values, first one is the last 1 minute cpu usage, 2nd one within last 5 minutes, the 3rd one is within 15 minutes. The 3rd one could be a good estimation of how busy the machine will be. I can just check each of every machine using uptime and find one that is least utilized.
Tunneling
Support in this case I have my computer A, when log in to the cluster, the machine is B through a public ip that is retrieved from domain record, but I really want to connect to machine C which in this case is on the same local area network with machine B. How could I connect from A to C through through B as if I connect directly from A to C. I found out this page that has really interesting illustrations of how tunneling works. I need to do some work when connect from A to B.
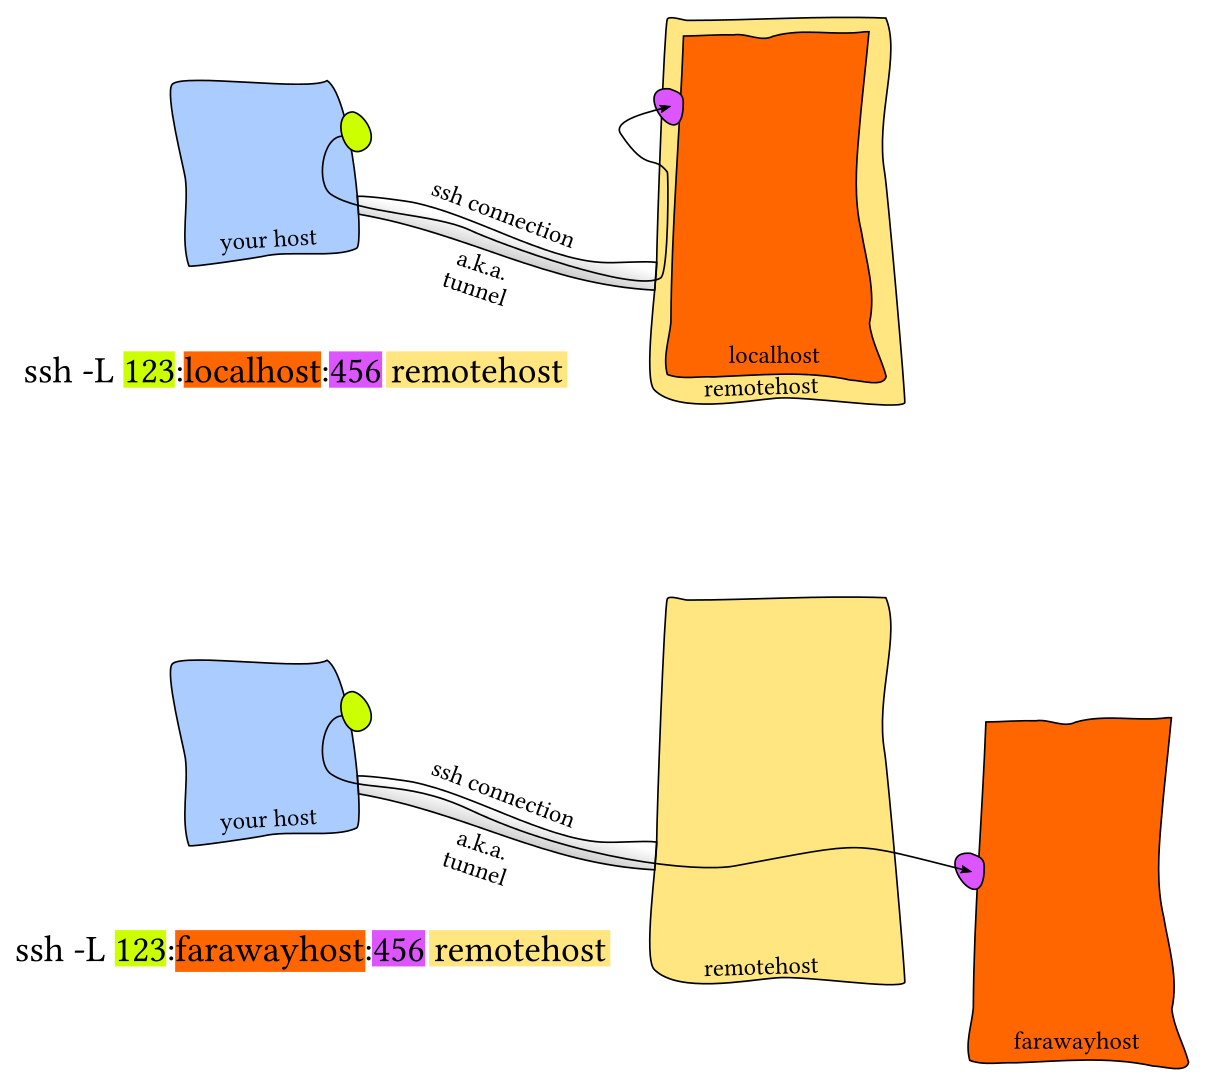
ssh -X -L:8000:C_IP_Address:22 user@B_Domain -vWith this command, I bind my local post 8000 to the C’s 22 port through the SSH connection from A to B, here’s the output when the connection is made.
Authenticated to B_Domain ([B_IP_Address]:22).
debug1: Local connections to :8000 forwarded to remote address C_IP_Address:22
debug1: Local forwarding listening on :: port 8000.
debug1: channel 0: new [port listener]
debug1: Local forwarding listening on 0.0.0.0 port 8000.
debug1: channel 1: new [port listener]
debug1: channel 2: new [client-session]
debug1: Requesting no-more-sessions@openssh.com
Thus I can connect to C via ssh “directly” using the following command:
ssh -X user@localhost -p 8000As you can see, I connect to my machine’s 8000 port, which will be forwarded to C’s 22 port through the tunneling or port forwarding technique. I also used -X to enable X Window applications. From there I can run virtuoso or other apps via X Window directly on the more powerful machine C. More detail about setting up and invoking cadence in Linux environment are shown here.
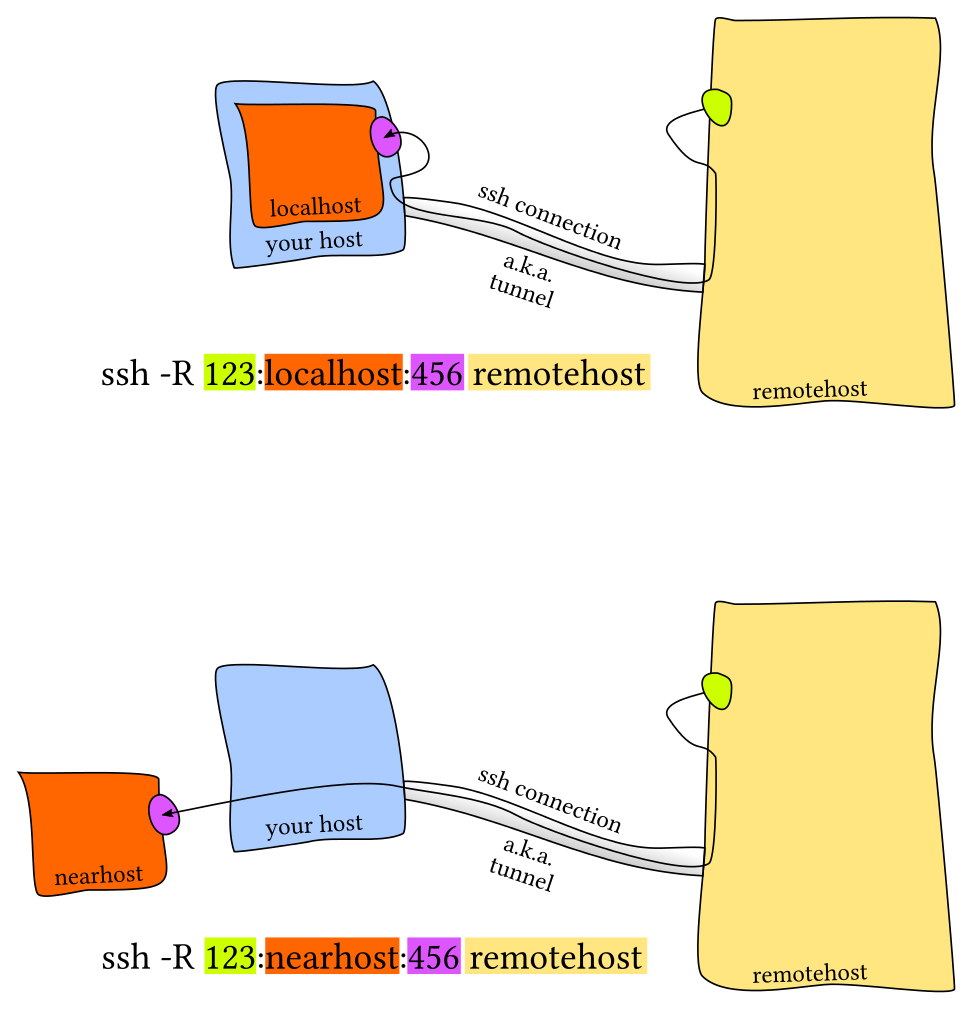
I’d like to refer to the images from the reference which is an answer from stackexchange for future illustration purposes, for local port forwarding as well as reverse port forwarding. Each of the forwarding conditions has 2 kinds of scenarios.


There are other interesting tunneling techniques that you could use, but I’m not going to dig deeper on that since that would be too out of topic.
Setup config file for tunneling
Some of the readers may think what if I could setup the config file specifically for the tunneling and things would be much easier as I don’t have to type or remember all the difficult command arguments, it turns out that SSH config file is able to do so, since people who developed ssh are much smarter than users and they are always ahead of us. Let me illustrate this on Linux based machines.
In your config file which typically refers to ~/.ssh/config, we put the config snippets for the configurations for machin B which acts as a proxy.
Host machine_B
  HostName machine_B_ip
  Port 22
  User machine_B_user
  ForwardAgent yes
  ForwardX11 yes
  IdentityFile path_to_machine_B_Identity
  IdentitiesOnly yes
  StrictHostKeyChecking no
  UserKnownHostsFile /dev/null
  LogLevel ERROR
Then we add the configurations for machine C which is the more powerful machine we want our commands to run.
Host machine_C
  HostName machine_C_ip
  Port 22
  User machine_C_user
  ProxyJump machine_B
  LocalForward 8000 localhost:8000
  ForwardAgent yes
  ForwardX11 yes
  IdentityFile path_to_machine_C_Identity
  IdentitiesOnly yes
  StrictHostKeyChecking no
  UserKnownHostsFile /dev/null
  LogLevel ERROR
That’s it, as you can see for the machine_C config, it uses ProxyJump which refers to machine_B to login to the system of machine C, so if you want to login to machin C, on command line you only need to type the following command:
ssh machine_C;That’s it, you are now in machine C which jumps from machine B, you are able to use the X window apps on machine C since ForrwardX11 on machine C is working. You could check out the hostname of the current login session to make sure that you are the machine that you want to use.
Conclusion
In this article, the topic of tunneling is discussed based on the situation that the machine we login to is not the most powerful one in the clusters, we need certain type of tunneling on SSH to login to specific machines in the clusters. How to choose the specific machine depending on its resources and availablity is discussed tunneling techniques are used. There are many different kinds of tunneling or port forwarding techniques but not all are discussed, the most relevant one is described. In addition, the detailed config snippets are given for easier usage and better user experience.
Leave a Reply